前言
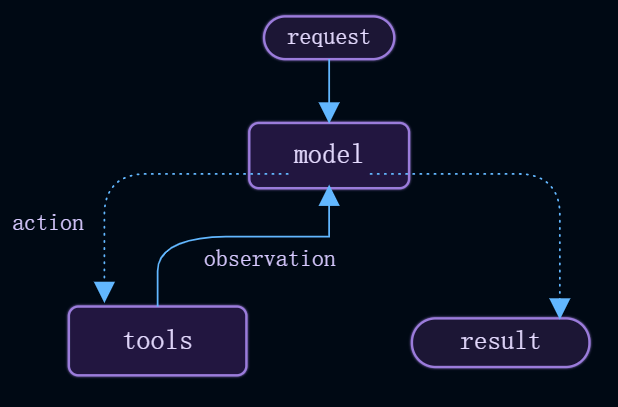
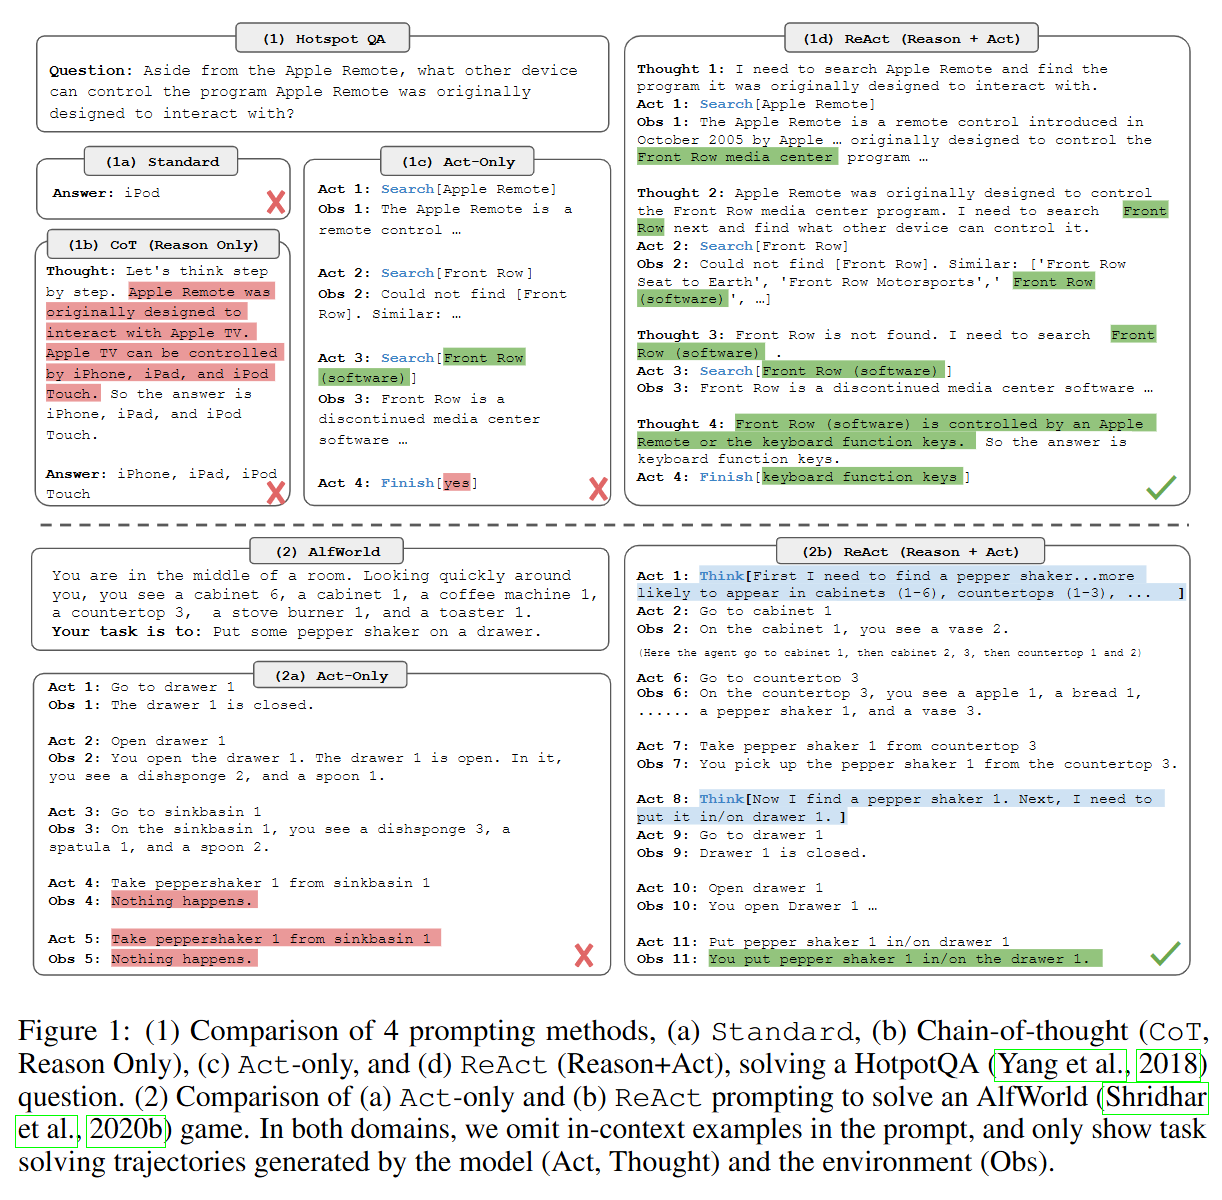
为了更深入理解agent的工程实现,本文会逐步从底层搭建一个agent(不借助任何框架如langchain等),agent是在循环中调用工具的模型,直到给定任务完成(ReAct架构),如下图所示。
image-20260731213620331
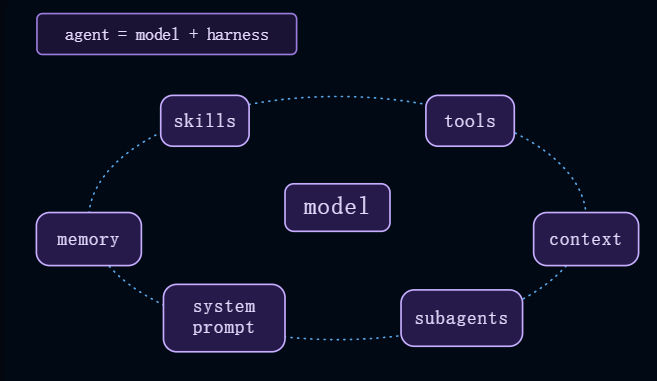
核心组件如下
image-20260731214119395
工具系统
先纠正一个常见误解
模型是怎么知道”该调工具了”还是”该直接输出答案”的?这个判断是
LangChain/LangGraph 实现的吗?
“判断”根本不是 LangChain/LangGraph
实现的,是模型本身的能力。
OpenAI 等厂商对模型做过 function
calling(工具调用)专项训练:模型学会了一件事——当请求里带有工具描述、且对话内容需要工具时,输出一个结构化的
tool_calls;不需要时,输出普通文本。这个决策发生在
OpenAI 服务器上的模型推理过程中 ,LangChain
源码里没有、也不可能有一行”决定何时调工具”的逻辑。
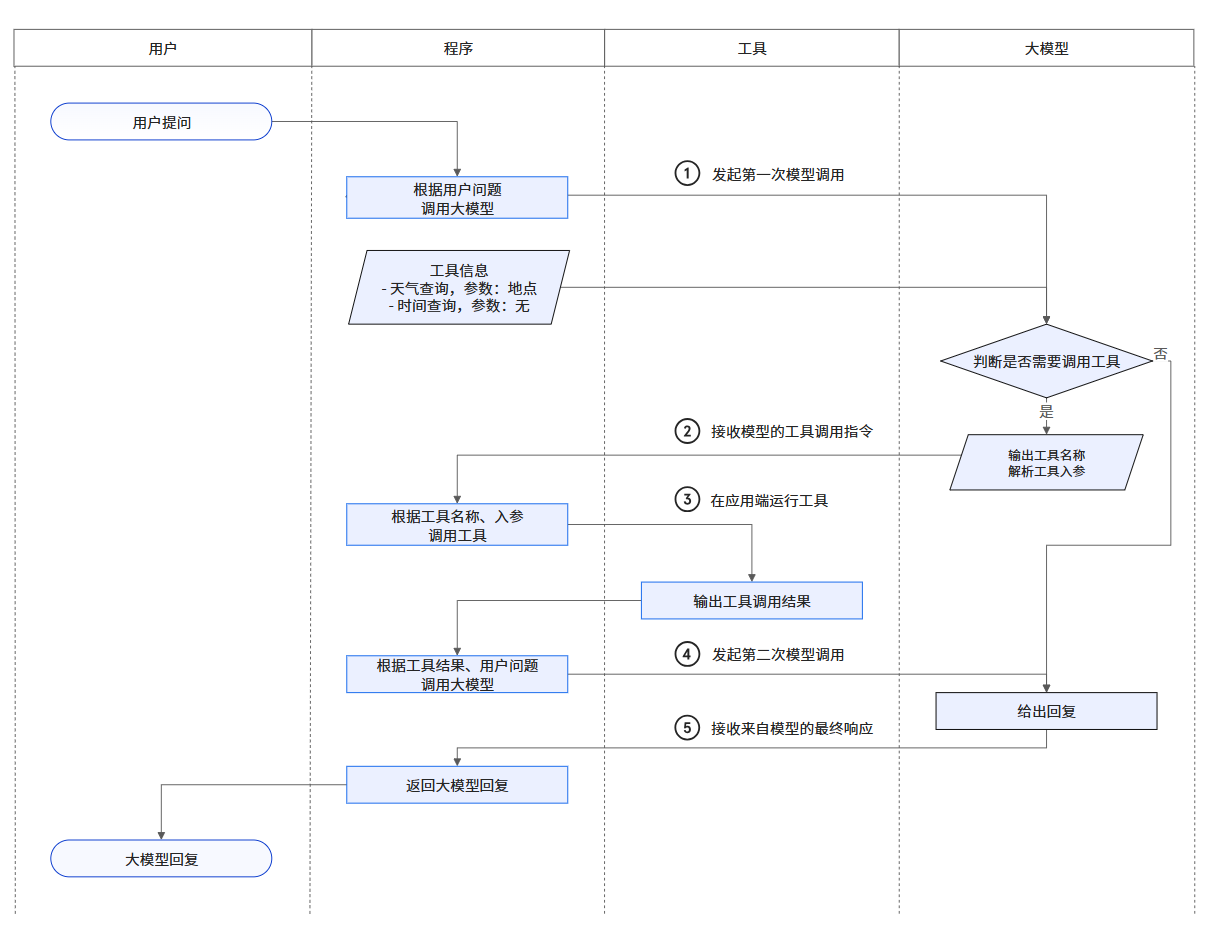
工具调用流程
1 2 3 4 5 6 7 8 9 10 11 12 13 14 15 16 17 18 19 20 21 22 23 24 25 26 27 28 29 30 31 32 33 34 35 36 === 1. 上行翻译:Python 函数 -> 模型看得懂的 JSON schema === { "type": "function", "function": { "name": "multiply", ← 来自函数名 "description": "Multiply two integers.", ← 来自 docstring "parameters": { ← 来自类型标注 a: int, b: int "properties": { "a": { "type": "integer" }, "b": { "type": "integer" } }, "required": ["a", "b"], "type": "object" } } } === 2. 实际发给 OpenAI 的完整请求 payload === { "model": "gpt-4.1-mini", "stream": false, "tools": [ ...上面那段 schema... ], ← tools 是请求的顶层字段 "messages": [ { "content": "Use the multiply tool to calculate 37 times 19.", "role": "user" } ] } === 3. 下行翻译:OpenAI 原始响应 -> AIMessage.tool_calls === message 类型: AIMessage content: '' tool_calls: [{'name': 'multiply', 'args': {'a': 37, 'b': 19}, 'id': 'call_abc123', 'type': 'tool_call'}] 路由判断 bool(msg.tool_calls) = True -> 去 tools 节点 === 4. 模型决定直接回答(不调工具)时 === tool_calls: [] bool(msg2.tool_calls) = False -> 去 __end__
image-20260731221318443
工具参数
人类选择工具前需了解工具的功能、使用场景和输入参数。大模型同理——模型依据这些信息选择合适的工具。按以下JSON格式提供工具信息。
1 2 3 4 5 6 7 8 9 10 11 12 13 14 15 16 17 { "type": "function", "function": { "name": "get_current_weather", "description": "当你想查询指定城市的天气时非常有用。", "parameters": { "type": "object", "properties": { "location": { "type": "string", "description": "城市或县区,比如北京市、杭州市、余杭区等。" } }, "required": ["location"] } } }
type字段固定为"function";function字段为 Object 类型;
name字段为自定义的工具函数名称,建议使用与函数相同的名称,如get_current_weather或get_current_time;description字段是对工具函数功能的描述,大模型会参考该字段来选择是否使用该工具函数。parameters字段是对工具函数入参的描述,类型是 Object
,大模型会参考该字段来进行入参的提取。如果工具函数不需要输入参数,则无需指定parameters参数。
type字段固定为"object";properties字段描述了入参的名称、数据类型与描述,为
Object 类型,Key 值为入参的名称,Value 值为入参的数据类型与描述;required字段指定哪些参数为必填项,为 Array 类型。
发起 Function Calling
前,在代码中定义工具信息数组(tools),包含每个工具的函数名、描述和参数定义。该数组在后续请求时作为参数传入。
工具注册机制
把「一个函数变成可调用的工具」其实分两步:
@tool (打包):把一个函数 → 一个 Tool(说明书 +
函数本体)。产出的是一个对象。ToolRegistry.register(注册):把一堆 Tool 收进注册表(内部 name →
Tool 字典)。产出的才是一张能按名查人的花名册,registry.execute
就靠它,凭模型回传的名字字符串反查到真函数。
函数注册为工具
1 2 3 4 @tool def multiply(a: int, b: int) -> int: """Multiply two integers.""" return a * b
这段和下面完全等价:
1 2 3 4 5 def multiply(a: int, b: int) -> int: """Multiply two integers.""" return a * b multiply = tool(multiply) # ← @tool 就是帮你写了这一行
所以 tool 就是个普通函数:吃进去一个函数,吐出来一个 Tool。@
只是语法糖。
这里藏着一个你最好亲自验证一下的事实——执行完 multiply =
tool(multiply) 之后,multiply 这个名字已经不是函数了,而是一个 Tool
对象。原来的函数被塞进了 Tool.func 里存着。
1 2 3 4 5 6 class Tool: """一个可被模型调用的工具:函数本体 + 发给模型的 JSON schema(类化重构后)。""" func: Callable[..., Any] # 函数本体 name: str # 工具名(默认函数名) description: str # 描述(默认 docstring) params_model: type[BaseModel] # pydantic 参数模型(create_model 动态建模)
Callable[..., Any] 是什么
Callable 来自
from typing import Callable(第 12
行),它是一个泛型类型 ,写法是
Callable[[参数类型...], 返回类型]。比如:
1 2 3 Callable [[int , str ], bool ]
完整调用链
第 1 步:装饰时把函数存进 Tool
1 2 3 4 5 6 return Tool( name=func.__name__, # 比如 "get_weather" ... func=func, # ← 原函数本体存进来了 )
第 2 步:调用时按名字找回这个包裹(registry.execute 内部)
1 2 name = tc["function"]["name"] # 模型说:"我要调 get_weather" target = registry.get(name) # 查注册表,拿到对应的 Tool 对象(没有则 None)
第 3 步:解析模型给的参数(registry.execute 内部)
1 2 3 args = json.loads(tool_call.function.arguments) # 模型传来的是 JSON 字符串,比如 '{"city": "北京"}' # 解析后变成 Python dict:{"city": "北京"}
第 4 步:用 func 真正调用(Tool.execute 内部)
1 2 result = target.execute(args) # 校验 + 执行(pydantic 参数校验,永不抛) # 等价于:get_weather(city="北京")
**args 是字典解包,把 {“city”: “北京”} 展开成关键字参数
city=“北京” 传给 func。这就是「利用 Tool 对象的 func
调用函数」的确切时刻。
create_model
动态建模工具参数
为什么必须动态?
框架是「库」,不知道你会写什么工具
my_agent_core 是被 main.py
使用的库。库的代码在写的时候,根本不知道使用者会注册哪些工具:
1 2 3 4 5 6 7 8 @tool def get_weather(city: str) -> str: ... # 用户可能写 1 个字段 @tool def multiply(a: int, b: int) -> int: ... # 可能写 2 个字段 @tool def search_docs(query: str, tags: list[str], limit: int = 5) -> str: ... # 3 个字段,类型各异
每个工具的参数形状都不一样。如果模型类是静态的,框架就得在源码里把「所有可能的工具签名」都写成类——那是不可能的。唯一的出路是:模型类在运行时、根据实际收到的函数来造。
实现
1 2 3 4 5 6 # tools.py:76 model = create_model( f"{func.__name__}_Args", # 类名,如 "get_weather_Args" __config__=ConfigDict(extra="forbid"), **fields, # ← 关键 )
**fields 把 {“city”: (str, …)}
展开成关键字参数,等价于直接写:
create_model("get_weather_Args", __config__=..., city=(str, ...))
schema 在完整闭环里的角色
1 2 3 4 5 6 7 8 ① 框架 → 模型:发送 schema("我有这些工具,参数格式如下") │ ② 模型 → 框架:返回 tool_call name: "multiply" arguments: '{"a": 37, "b": 19}' ← 模型按契约生成的合规参数 │ ③ 框架执行:json.loads(arguments) → {"a": 37, "b": 19} func(**args) → 703 ← registry.execute 内部
第 ② 步值得多看一眼:‘{“a”: 37, “b”: 19}’ 这个 JSON
字符串是模型自己生成的——它读了 schema,知道该给 a 和 b
各传一个整数,于是按格式”填表”。schema 写得好不好(尤其
description),直接决定模型用得对不对。这也是为什么文件开头把这一层叫「上行翻译层」:把
Python 函数翻译成模型能读懂的 JSON 说明书。
生成的 Tool.parameters 就是一份标准 JSON Schema:
1 2 3 4 5 6 7 8 { "type": "object", "properties": { "a": {"type": "integer"}, "b": {"type": "integer"}, }, "required": ["a", "b"], }
读作:「参数是一个对象,含 a、b 两个字段,都是整数,都必填」。注意第
56~57 行的循环就是在逐参数填这张「表」。
然后 Tool.to_openai_schema(或 registry.get_schemas 批量)再包一层
OpenAI API 要求的外壳:
1 2 3 4 5 6 7 8 [{ "type": "function", "function": { "name": "multiply", "description": "Multiply two integers.", "parameters": { ...上面那份 schema... }, }, }]
最终实现
1 2 3 4 5 6 7 8 9 10 11 12 13 14 15 agent.py(循环) → 只做:调用 registry.execute + 配对写回 │ registry.py(注册表) → 收完整 tool_call:json.loads + 查表 + 错误转 ToolResult │ tools.py(工具本体) → Tool 类:动态建模 + to_openai_schema + execute + __call__ │ ToolResult(结果) → 永不抛,ok/data/error,serialize 转字符串 --------------------- @tool def get_weather(city: str) -> str: ... # 一行定义 ↓ Tool 类(动态建模 + to_openai_schema + execute + __call__) ↓ ToolRegistry.register(tool) / execute(tool_call) # 注册表分发 ↓ agent.py: registry.execute(tc).serialize() # 循环只做调用 + 写回
Tool ToolRegistry
视角 单个工具
一群工具
知道其他工具吗 不知道,只管自己
知道全部,管它们的集合
懂协议格式吗 不懂(只收 args: dict)
懂(收完整 tool_call,内部解析)
一句话 「我怎么跑」
「谁在我这里,模型想调谁,我帮它找到并执行」
1 2 3 4 5 6 7 8 9 10 11 12 13 14 15 16 17 18 19 20 21 22 23 24 25 26 27 28 29 30 31 32 33 34 35 36 37 38 39 40 41 42 43 44 ToolResult(dataclass) @dataclass class ToolResult: ok: bool # 是否成功 data: Any = None # 成功时的结果数据 error: str | None = None # 失败时的错误消息 terminate: bool = False # 熔断退出标记(用于阶段 7 提前退出 ReAct 循环) meta: dict[str, Any] = field(default_factory=dict) # 结构化诊断元数据 def serialize(self) -> str: # 转成写入 messages 的字符串;失败返回错误文本 Tool(类) class Tool: def __init__( self, func, *, name: str | None = None, description: str | None = None, params_model: type[BaseModel] | None = None, is_parallel_safe: bool = False, # 关键:声明并发安全性(默认 False 保护因果顺序) timeout: float | None = None, # 执行超时时间(结合 asyncio.wait_for) raw_schema: dict[str, Any] | None = None, # 外部/MCP 预编译 Schema 透传 ): ... def execute(self, args: dict) -> ToolResult: # 校验 + 异步执行 + 超时保护,永不抛:pydantic 校验失败或工具异常 → ToolResult(ok=False, error=...) tool(模块级函数,装饰器工厂) def tool( func=None, *, name: str | None = None, description: str | None = None, params_model: type[BaseModel] | None = None, is_parallel_safe: bool = False, timeout: float | None = None, ): # @tool 装饰器工厂:支持 @tool 和 @tool(name=..., is_parallel_safe=True) # 内部构造 Tool 对象并返回
my_agent_core/registry.py
1 2 3 4 5 6 7 8 9 10 11 12 ToolRegistry(类) class ToolRegistry : def __init__ (self ): ... def register (self, tool: Tool ) -> None : ... def unregister (self, name: str ) -> None : ... def get (self, name: str ) -> Tool | None : ... def get_schemas (self ) -> list [dict ]: ... async def execute_batch (self, tool_calls: list [dict ] ) -> list [ToolResult]: """批量执行工具调用:一票否决制因果时序保护调度。"""
核心调度机制:一票否决因果保序并发(Unanimous
Parallel)
当大模型在单轮 ReAct 交互中同时发出多个工具调用(例如同时下发 5 个
tool_calls): 1. 全员通过才放行并发 :
系统检查该批次目标工具对象的并发标记:all(tool.is_parallel_safe for tool in batch_tools);
只有当该批调用的全部工具均为
is_parallel_safe=True(例如全为只读的 read,
grep, find, list),系统才调用
asyncio.gather 并发极速推进,总耗时由 O (N )O (1)一票否决回退保序串行 : 一旦批次中包含了哪怕一个
is_parallel_safe=False(例如包含写操作 edit,
write, todo
或外部未知工具),整批工具调用立刻自动降级为严格按大模型输出的原序串行执行 !
架构价值 :从调度器层面从根本上杜绝了“本应先写后读的操作,因并发导致先读到了脏数据”的因果时序倒置(Causal
Inversion) 风险!
在阶段 18 对标 Tau 架构的深度重塑中,工具返回协议将进一步向前迈进:
1.
多模态内容与诊断隔离(AgentToolResult) :
-
content: list[TextContent | ImageContent]:原生向大模型喂回文本块与图片块;
- details: JSONValue:专门向前端 TUI / CLI
传递诊断元数据 (如 exit_code, duration,
truncated_bytes),该字段完全不消耗大模型
Token,彻底解耦“给模型看的文本”与“给前端展示的数据”; 2.
动态工具扩展(added_tool_names) :
工具(如插件加载器或 MCP
动态发现)执行后,可通过此字段向会话声明动态新开放的工具集,触发上下文窗口的动态
Token 补算; 3.
提前交接终止信号(terminate) :
允许工具(如人机交互问卷或不可逆故障)主动向调度循环发出终止信号,无需等待模型多跑一轮。
内部工具
框架层除了让用户自己 @tool,还内置了一批工具——放在
my_agent_core.tools.builtin
包,用工厂函数 构造。其中四个文件工具对标 pi
的基本四件套:
工具
签名
作用
readread(path, limit=None)读文件,limit 按行截断
writewrite(path, content)写文件(自动建父目录、覆盖)
editedit(path, old_text, new_text)精确替换一处文本
bashbash(command)在 workspace 根执行 shell
两个共同的关键点
① 工厂函数收
root——路径逃逸防护的边界
四个工具都长这样(工厂函数吃 root,吐
Tool):
1 2 3 4 def make_read_tool (root: str | Path ) -> Tool: def read (path: str , limit: int | None = None ) -> str : ... return Tool(func=read, name="read" )
root 是「工作区根目录」,工具内部每条路径都先过一遍
_safe_path:
1 2 3 4 5 def _safe_path (root: Path, p: str ) -> Path: path = (root / p).resolve() if not path.is_relative_to(root): raise ValueError(f"Path escapes workspace: {p} " ) return path
resolve() 把 ../etc/passwd
折算成绝对路径,is_relative_to(root)
检查它还在不在根里,逃逸就报错——这是文件工具的第一道安全门。
② 错误不抛,且提供精细化纠错提示(Prompt-Quality
Errors)
四个工具内部都是
try/except,把异常转成极具指导意义的错误字符串返回,给模型提供明确的自我纠错线索:
- read:越界时明确返回文件实际总行数(如
Offset 200 is beyond end of file ('app.py' has only 80 lines total));
-
edit:未找到时提示检查缩进与换行,多处匹配时提示提供更多上下文;
-
bash:超时时自动捕获并保留超时前打印的已输出日志,方便模型判断是否卡在交互输入(如
-y)。
③ FileMutationQueue
细粒度文件锁(并发安全与性能兼得)
write 和 edit 工具内部通过
FileMutationQueue 按文件绝对路径获取
asyncio.Lock。修改不同文件时全员并发执行,修改同一文件时自动排队串行,兼备极致性能与写安全性。
bash 的额外两道防护
1 2 3 4 5 6 7 8 _DANGEROUS = ["rm -rf /" , "sudo" , "shutdown" , "reboot" , "> /dev/" ] def bash (command: str ) -> str : if any (d in command for d in _DANGEROUS): return "Error: Dangerous command blocked" r = subprocess.run(command, shell=True , cwd=root, capture_output=True , text=True , timeout=120 ) return (r.stdout + r.stderr).strip() or "(no output)"
危险命令黑名单 :rm -rf /、sudo
这类直接拦下。是「尽力而为」的字符串匹配,不是真沙箱(真隔离得靠容器/权限层,那是
coding agent 层的事)。120 秒超时 :sleep 1000
这种挂死命令不会无限等,超时返回
"Error: Timeout (120s)"。
为什么是「工厂函数」而不是「直接一个工具」
因为 root
是显式的、每个应用不同——框架层不知道你的工作区在哪。所以工具是
make_read_tool(root) 现造的,调用方(将来 coding agent
层)传自己的 workspace 根进去,再
Agent(tools=[make_read_tool(root), ...])
装配。这和「@tool
装饰器直接定义」的区别在于:内置工具需要一个运行时才知道的参数(root)注入。
永不抛出:工具出错也是一条消息
## 一、 观念转变:异常 vs 消息(谁才是接收者?)
理解这一节的关键,在于搞清楚错误是给谁看的:
1 2 3 4 5 6 7 8 ❌ 传统思路(把错误当成异常): 工具报错 (FileNotFoundError) ──> 穿透调用栈 ──> 打断 Agent Loop ──> 终端崩溃 ──> 只能由人类程序员重新启动。 【接收者是 Python 解释器 / 调用栈】 ✅ Agent 哲学(把错误当成一条消息): 工具报错 (FileNotFoundError) ──> 框架捕获 ──> 包装成普通消息: ToolResultMessage(isError=True) ──> 追加进上下文 ──> 喂给大模型 ──> 模型看懂了:“路径错了,我先 ls 看看目录” ──> 自动修复! 【接收者是大模型】
## 二、 统一出口:6 种错误,1 种产物
在工具调用的完整生命周期中,可能会有 6
个不同阶段抛错,但无论哪一步挂掉,Pi
都保证绝不向外抛异常,全部归一化为一条标准的 ToolResultMessage:
1 2 3 4 5 6 7 8 LLM 输出 ToolCall │ ├── 1. 工具不存在 (如模型幻觉造了一个未注册的工具) ────> ToolResultMessage { isError: true, content: "Tool xxx not found" } ├── 2. prepareArguments 参数预处理抛错 ───────────────> ToolResultMessage { isError: true, content: 预处理异常 } ├── 3. Schema 参数强校验失败 (如传错类型) ───────────> ToolResultMessage { isError: true, content: Pydantic 校验错误 } ├── 4. beforeToolCall 权限拦截 (如危险命令被阻断) ─────> ToolResultMessage { isError: true, content: 拦截原因 } ├── 5. tool.execute 运行时崩溃 (如 500/超时/文件不存在) ─> ToolResultMessage { isError: true, content: 运行时异常 } └── 6. afterToolCall 后置处理抛错 ────────────────────> ToolResultMessage { isError: true, content: 后置异常 }
对 Agent Loop 而言:它看到的结果永远是一个干净的
ToolResultMessage,因此主循环的 while
可以安全地继续转动,把结果喂给下一轮大模型。
经典对比(看看 Pi
是怎么写第一层的):
### 1. Read 工具(read.ts)
❌ 差的报错:raise Exception(“Read error”) → 模型两眼一抹黑。
✅ Pi 的报错:Offset 200 is beyond end of file (100 lines total) →
模型立即明白:“文件只有 100 行,那我下次传 offset=50”。
### 2. Bash 工具(bash.ts)
❌ 差的报错:raise Exception(“Command failed”)。
✅ Pi 的做法(教科书级): 把“执行到一半已经被捕获的 stdout
输出” + “退出码 / 超时状态” 打包在一起返回: 1 2 3 4 5 Command failed with exit code 1. --- Output before error --- npm ERR! code ENOENT npm ERR! syscall open npm ERR! path /package.json
异常 → 消息:编码前后对比
1 2 3 4 5 6 7 8 9 10 11 12 13 14 工具抛出的原始异常(except 之前): 编码后的 ToolResultMessage(except 之后): FileNotFoundError: [Errno 2] No such { → 一路穿透管道 role: "toolResult", → 打断 Agent Loop toolCallId: "call_abc", → 事件序列不完整,UI 卡死 toolName: "read", content: [{ type: "text", text: "[Errno 2] No such file or directory" }], isError: True ← 唯一标记 } → 追加到对话历史 → 下一轮发给模型 → 模型看到后自己决定怎么办
写自定义工具时的最佳实践
借鉴 Bash 工具的写法,自定义工具的 execute 应该长这样:
1 2 3 4 5 6 7 8 9 10 11 12 13 14 15 16 17 18 19 20 21 22 23 async def execute_custom_tool (params: MyArgs ) -> ToolResult: try : result_data = await do_some_io(params) return ToolResult(ok=True , data=result_data) except KnownBusinessErrorA as err: return ToolResult( ok=False , error=f"Resource '{params.id } ' not found. Available IDs are: {get_available_ids()} " ) except KnownBusinessErrorB as err: return ToolResult( ok=False , error=f"Timeout after {params.timeout} s. Try increasing timeout or splitting query." ) except Exception as err: return ToolResult(ok=False , error=f"Unexpected failure: {type (err).__name__} : {err} " )
终极防线:工具尚未执行就被中途中断?——对标
Tau 的 tool_history 三阶段自愈状态机
在前一章中,我们详细分析了“永不抛出(Never-Throw)” 原则——它保证了当代码执行进工具函数内部时,即便遇到异常也会被包装为
ToolResult(ok=False, error=...),避免 Agent 进程崩溃。
但是在真实大模型 Agent
系统中,还潜伏着一个更隐蔽、破坏力更强的系统级死穴:如果工具压根“没来得及执行完”,或者在执行前夕就被外部打断了呢?
各大主流大模型(OpenAI、Anthropic、DeepSeek 等)在设计 Function
Calling 协议时,有着严苛的图灵机契约:
🚨 模型 API 契约约束 : 如果一条
assistant 消息声明了
tool_calls: [{"id": "call_123", ...}],那么在对话历史中,其紧邻的下一条消息必须是
role: "tool" 且带上匹配的
tool_call_id: "call_123"。
如果出现以下任何一种真实突发场景: 1.
用户主动取消 :模型发起了一个耗时 30
秒的编译命令工具,用户等不及直接按了 Ctrl+C 或触发了
await agent.abort(); 2.
网络异常截断 :模型吐出了工具调用描述后,网络突然抖动中断;
3. 并发工具部分失败 :模型一次性发起了 3
个并发工具调用,第 1 个执行成功,第 2 个发生致命系统错误直接退出了当轮
ReAct 迭代。
这会导致会话历史里留下了一条“只有 ToolCall,没有对应
ToolResult” 的消息——即断头调用 。
现实案例剖析:一个“断头”如何让会话彻底脑死亡?
我们来看一个真实发生过的典型崩溃场景:
模型决定调用工具 :一次性生成了两个工单
call_001(读 a.txt)和 call_002(一个耗时 30
秒的巨型编译命令)。正常执行前半截 :call_001
顺利执行完成,结果回填。中途意外打断 :正在执行 call_002
时,用户等不及了按下了 Ctrl+C ,或者代码里触发了
await agent.abort()。致命空档产生 :此时 Python
进程被打断,call_002
根本没有产生任何返回值 。坏死数据固化 :会话历史直接停留在这一秒,并持久化到了硬盘的
.jsonl 文件中。
此时磁盘里的消息记录变成了这种残缺状态(断头了!):
1 2 3 4 5 6 7 8 9 10 11 12 13 14 15 16 [ { "role" : "user" , "content" : "帮我处理一下代码" } , { "role" : "assistant" , "tool_calls" : [ { "id" : "call_001" , "name" : "read" } , { "id" : "call_002" , "name" : "build" } ] } , { "role" : "tool" , "tool_call_id" : "call_001" , "content" : "a.txt 的内容是 Hello" } ]
接下来会发生什么悲剧?
当下一次用户再发一句新的话(比如:“算了,不要编译了,给我讲个笑话吧”):
Agent 会把上面这段包含断头的历史加上新的提问,一起打包发给 OpenAI /
DeepSeek / Claude。
大模型服务端的网关校验器一扫历史,发现 assistant 发起了
call_002,后面居然没有对应的 tool
结果,网关直接无情抛出:
1 2 3 HTTP 400 Bad Request: An assistant message with 'tool_calls' must be followed by tool messages responding to each 'tool_call_id'. Missing tool response for: call_002.
更致命的是:因为这条残缺的历史记录已经保存在你的硬盘会话文件里了,以后只要你加载这个会话,无论发什么新指令,大模型永远报
400!这个会话文件就彻底“脑死亡”报废了!
tool_history.py
是如何化解这场悲剧的?
tool_history.py
就像一个“消息转录本的智能外科医生兼安检门”。在会话从磁盘恢复后、以及每次送给大模型之前,它都会对整个消息链进行拓扑自愈。
当它扫描到上述残缺历史时,发现 call_002
悬空无下文,它会在内存中自动就地合成一条合法的工具结果插进去:
1 2 3 4 5 6 { "role" : "tool" , "tool_call_id" : "call_002" , "content" : "Tool call interrupted by user" , "metadata" : { "is_error" : true } }
这样一来,两全其美: 1. 大模型的 API
契约瞬间被满足了 :每个 call 都有对应的
tool 结果紧随其后,API 绝对不会再报 400 拒绝服务! 2.
大模型的认知逻辑也顺畅了 :模型看到
Tool call interrupted by user,在上下文中就自然理解“哦,原来刚才那个任务被用户取消了”,下一轮它就能基于这个事实正常回答!
2. 为什么简单的遍历补齐搞不定?
最朴素的想法是:“遍历消息列表,只要发现某条 Assistant 消息有
tool_calls,后面没跟 Tool 消息就硬塞一条假消息进去。”
在严苛的工程实践中,这种写法会踩进大坑: 1. 跨轮同名 ID
复用 :某些开源或商用模型在多轮长对话中,可能会重复生成相同的
tool_call_id(如多次调用都叫
"call_0")。朴素遍历极易把第 5 轮的真实合法结果“偷”给第 1
轮的同名调用,导致第 5 轮反而变成了断头! 2.
位置错位与孤儿结果(Orphan
Results) :偶尔因并发乱序或重试,存在没有被任何 Assistant
声明引用的游离 ToolResult。如果在上下文中放行,同样会触发 API 400
报错。
3. 对标 Tau
的三阶段确定性拓扑自愈算法
为了彻底扫清断头死锁,我们在阶段 17 深度对齐了 Tau
(tau_agent.tool_history)
的三阶段确定性自愈状态机,并在核心层实现了
my_agent_core/tool_history.py。
算法核心流转拓扑如下:
1 2 3 4 5 6 7 8 9 10 11 12 13 14 15 16 17 18 19 20 21 22 23 24 25 26 27 28 29 30 31 32 33 34 35 36 原始可能有断头/孤儿的历史消息列表 │ ▼ ┌─────────────────────────────────────────────────────────────┐ │ 【Phase 1: 预留就近配对 (Reserve Adjacent Pairs)】 │ │ 先扫描当前位置与期望位置完全匹配的合法结果,建立强绑定排他 │ │ 锁定,占住位点,绝对防止被跨轮同名 ID 或贪心扫描错误抢夺! │ └──────────────────────────────┬──────────────────────────────┘ │ ▼ ┌─────────────────────────────────────────────────────────────┐ │ 【Phase 2: 贪心匹配与断头补齐 (Greedy Match or Synthesize)】 │ │ 对所有未被锁定的 ToolCall 进行向后贪心扫描: │ │ • 优先在调用位置之后寻找合法的真实结果; │ │ • 若彻底找不到,自动合成标准中断结果: │ │ Message(role="tool", content="Tool call interrupted by │ │ user", metadata={"tool_call_id": id, │ │ "is_error": True}) │ └──────────────────────────────┬──────────────────────────────┘ │ ▼ ┌─────────────────────────────────────────────────────────────┐ │ 【Phase 2.5: 真实结果反超 (Real Result Priority)】 │ │ 若后续扫描发现由于遍历顺序遗漏了真实合规的结果,立即撤销 │ │ 已合成的中断占位,让真实结果反超生效! │ └──────────────────────────────┬──────────────────────────────┘ │ ▼ ┌─────────────────────────────────────────────────────────────┐ │ 【Phase 3: 转录本重塑与孤儿清理 (Reconstruction & Pruning)】 │ │ • 按照 Assistant 声明的调用顺序,严格紧随插入匹配的工具结果 │ │ • 凡是没有被任何 ToolCall 认领的游离结果(孤儿),全部剔除!│ └─────────────────────────────────────────────────────────────┘ │ ▼ 100% 结构合法的自愈转录本
4.
核心源码落地与诊断模型 (tool_history.py)
自愈函数返回一个结构化不可变诊断数据类
ToolHistoryRepair:
1 2 3 4 5 6 7 8 9 10 11 12 13 _INTERRUPTED_TOOL_RESULT = "Tool call interrupted by user" @dataclass(frozen=True , slots=True ) class ToolHistoryRepair : """修复后的合法转录本以及结构化诊断计数。""" messages: tuple [Message, ...] changed: bool = False synthesized_results: int = 0 dropped_orphan_results: int = 0 dropped_duplicate_results: int = 0 reordered_results: int = 0
核心修复算法 repair_tool_history 的精简实现:
1 2 3 4 5 6 7 8 9 10 11 12 13 14 15 16 17 18 19 20 21 22 23 24 25 26 27 28 29 30 31 32 33 34 35 36 37 38 39 40 41 42 43 44 45 46 47 48 49 50 51 52 53 54 55 def repair_tool_history (messages: Sequence [Message] ) -> ToolHistoryRepair: """对会话历史进行确定性拓扑自愈,确保所有工具调用均合法闭合。""" call_occurrences = ... results_by_id = ... selected_results: dict [tuple [int , int ], tuple [int | None , Message]] = {} used_result_positions: set [int ] = set () synthesized_results = 0 for occurrence, call, expected_pos in call_occurrences: if expected_pos < len (messages) and _get_tool_call_id(messages[expected_pos]) == call.get("id" ): selected_results[occurrence] = (expected_pos, messages[expected_pos]) used_result_positions.add(expected_pos) for occurrence, call, _ in call_occurrences: if occurrence in selected_results: continue call_id = str (call.get("id" , "" )) candidates = results_by_id.get(call_id, []) matched_pos, matched_msg = _find_best_candidate(candidates, used_result_positions, occurrence[0 ]) if matched_msg is not None : selected_results[occurrence] = (matched_pos, matched_msg) used_result_positions.add(matched_pos) else : synthetic = Message( role="tool" , content=_INTERRUPTED_TOOL_RESULT, metadata={"tool_call_id" : call_id, "is_error" : True }, ) selected_results[occurrence] = (None , synthetic) synthesized_results += 1 repaired: list [Message] = [] for msg_idx, message in enumerate (messages): if message.role == "tool" : continue repaired.append(message) if message.role == "assistant" : for offset in range (1 , len (_get_tool_calls(message)) + 1 ): _, tool_res = selected_results[(msg_idx, offset)] repaired.append(tool_res) return ToolHistoryRepair(messages=tuple (repaired), changed=..., synthesized_results=synthesized_results, ...)
5.
架构级双重防护网:内层 Never-Throw 护函数,外层 tool_history
护转录本
通过这次 Tau
对齐演进,整个工具调用系统形成了固若金汤的双层立体防御架构 :
防御层级
核心护卫模块
拦截时序
防护目标
最终结果
内层执行防御 Tool.execute() (Pydantic +
Try/Catch)工具函数执行中
参数非法、业务抛错、OS 路径逃逸、超时
转为 ToolResult(ok=False)
反馈大模型自纠,Agent 循环不崩
外层拓扑防御 tool_history.py
(repair_tool_history)会话反序列化 / agent.abort()
/ 调用 LLM 前夕
用户按 Ctrl+C
中断、网络断流、断头调用、孤儿结果
确定性自愈重构转录本,大模型 API
永不报 400
至此,哪怕用户在工具并发执行的任意毫秒暴力掐断任务,或者强行杀死进程后重启系统,会话也能在毫秒级内自动恢复闭合,彻底攻克了大模型应用中最棘手的会话持久化死锁顽疾!
6.
工业级七阶段工具执行流水线:并发批处理与实时进度流
在完成了工具参数校验和拓扑自愈后,当大模型在一轮中发起了多个工具调用时,我们进入了最核心的
工具执行车间 (_execute_tools_turn) 。
严格对齐 Pi 官方架构契约与 Tau
微内核设计,工具执行被划分为七个确定性阶段:
阶段 1:输出截断防御检查
(_fail_tool_calls_from_truncated_message) :
当检测到模型输出触达 Token
上限被截断(stop_reason == "length")时,断然拒绝执行任何工具,防止流式
salvage
拼出残缺参数导致代码写崩或命令腰斩。自动合成警告错误并回传模型引导重新完整发起调用。阶段 2:Preflight 广播
(ToolExecutionStart) : 在审批与执行前,率先按
source order 广播 ToolExecutionStart,使 UI
能够毫秒级渲染工具准备运行状态。阶段 3:串并行决策网关
(ToolRegistry.execute_batch) :
悲观读写分流:全只读安全工具(is_parallel_safe=True)启用
asyncio.gather
全并发加速;只要包含任一写入/串行工具,整批退化为保序串行执行,防止因果时序倒置。阶段 4:前置审查审批与改参
(before_tool_call) : 通过
_coerce_tool_call 归一化入参,调用
before_tool_call
审批,支持安全阻断(block)与参数就地热修改(updated_args)。阶段 5:并发批执行与流式进度回传
(ToolExecutionUpdate) : 采用
asyncio.Queue 与 loop.call_soon_threadsafe
跨线程安全桥接,支持长耗时工具(如 Bash
编译或子代理)在运行态向外广播累积快照(Cumulative
Snapshot)。生命周期锁存(accepting_updates)确保工具返回后丢弃迟到回调。阶段 6:后置改写与单工具终态广播
(after_tool_call &
ToolExecutionEnd) : 调用
after_tool_call
支持结果脱敏与改写(updated_result),广播包含
terminate 状态的 ToolExecutionEnd。阶段 7:转录本保序归档与批量优雅熔断
(MessageStart/End &
should_terminate) :
无论并发执行完成顺序如何,回传大模型的 role="tool"
消息严格按 Assistant 原始 Source Order
恢复排布。若批次中任一工具(any() 语义)或 Hook 返回
terminate=True,立即终结 ReAct 循环,保全
final_text 并正常交付结果。
阶段 5
核心攻坚:生产者-消费者管道与三大技术死结破解
在实现第 5
阶段(并发执行与实时流式进度回传)时,架构面临了三个看似不可调和的技术冲突:
1 2 3 4 5 6 7 8 9 10 11 12 13 【冲突 1】异步生成器 vs 并发批量执行 • 需求 A:多个工具必须并发跑(比如同时读 3 个文件),底层用的是 asyncio.gather(...); • 需求 B:_execute_tools_turn 是一个生成器,必须一有进度就立刻 yield 出去。 • 痛点:在 asyncio.gather 的深处是不能直接向外层生成器 yield 的! 【冲突 2】主事件循环 vs 工作线程池 • 需求 A:很多工具是同步的(如普通的 Python 函数、调用操作系统的 bash),必须扔进线程池 asyncio.to_thread 跑,不能卡死主线程; • 痛点:Python 的异步队列 asyncio.Queue 是严格单线程的,工作线程直接碰队列就会崩溃闪退! 【冲突 3】实时流式读取 vs 任务结束防死锁 • 需求 A:前台必须一直监听队列,只要有日志就拿出来; • 痛点:前台怎么知道后台什么时候“全部跑完了”?如果盲目等,后台跑完后前台就会永久卡死(死锁)。
破局方案:前后台解耦的“单向传送带”管道模型
1 2 3 4 5 6 7 8 9 10 11 12 13 14 15 16 17 18 19 20 21 22 23 24 25 26 27 ┌──【后台 Producer: runner 异步任务】──┐ │ │ │ 并发执行 tool_1, tool_2, tool_3 ... │ │ │ │ │ ▼ 产生进度 │ │ on_update("50% complete") │ │ │ │ │ ▼ │ │ safe_put_update (线程安全路由) │ │ ├─ 主线程: queue.put_nowait() │ │ └─ 工作线程: call_soon_threadsafe │ │ │ │ │ ▼ 写入 │ └─────────────> ┌────────┐ <────────────┘ │ 异步队列│ │ queue │ └────────┘ │ ▼ 读取 ┌──【前台 Consumer: 生成器主循环】────┐ │ │ │ while True: │ │ item = await queue.get() │ │ if item is _SENTINEL: break │ │ yield item (实时推给前端 UI!) │ │ │ └───────────────────────────────────────┘
核心代码落地:5
个严丝合缝的实现步骤
1 2 3 4 5 6 7 8 9 10 11 12 13 14 15 16 17 18 19 20 21 22 23 24 25 26 27 28 29 30 31 32 33 34 35 36 37 38 39 40 41 42 43 44 45 46 47 48 49 50 51 52 53 54 55 56 57 58 59 60 61 62 63 64 65 66 67 if prepared_calls: queue: asyncio.Queue[Event | object ] = asyncio.Queue() _SENTINEL = object () loop = asyncio.get_running_loop() loop_thread_id = threading.get_ident() def safe_put_update (ev: Event ) -> None : if threading.get_ident() == loop_thread_id: queue.put_nowait(ev) else : with contextlib.suppress(RuntimeError): loop.call_soon_threadsafe(queue.put_nowait, ev) def make_on_update (call_id: str , tool_name: str , args: dict [str , Any ] ) -> Callable [[Any ], None ]: def on_update (partial: Any ) -> None : safe_put_update( ToolExecutionUpdate( tool_call_id=call_id, tool_name=tool_name, args=args, partial_result=partial, ) ) return on_update calls_to_run = [ (call.name, current_args, make_on_update(call.id , call.name, current_args), call.id ) for _, call, current_args in prepared_calls ] async def _run_batch () -> list [ToolResult]: try : return await registry.execute_batch(calls_to_run, signal=signal) finally : if threading.get_ident() == loop_thread_id: queue.put_nowait(_SENTINEL) else : with contextlib.suppress(RuntimeError): loop.call_soon_threadsafe(queue.put_nowait, _SENTINEL) runner = asyncio.create_task(_run_batch()) try : while True : item = await queue.get() if item is _SENTINEL: break if isinstance (item, Event): yield item batch_out = await runner for (idx, _, _), res in zip (prepared_calls, batch_out, strict=False ): direct_results[idx] = res except Exception as exc: for idx, _, _ in prepared_calls: if idx not in direct_results: direct_results[idx] = ToolResult(ok=False , error=f"Tool execution failed: {exc} " ) finally : if not runner.done(): runner.cancel() with contextlib.suppress(asyncio.CancelledError, Exception): await runner
这套架构将“不可流式的多任务并发”优雅转化为“可流式的单通道事件流”,用
call_soon_threadsafe 抹平了同步线程与异步主循环的鸿沟,用
_SENTINEL 彻底封死了死锁漏洞,达到了真正的工业级水准!
深度辨析:宏观串并行
vs 微观同异步(及异步队列的本质)
很多开发者在理解工具并发与流式回传时,容易把“宏观调度的串并行” 和“底层函数的同异步” 混淆。实际上,这是两个完全正交的独立维度:
维度
关心的核心问题
决定者
核心手段
维度
1:宏观批处理 这批工具是一起开工,还是一个接一个排队?
ToolRegistry.execute_batchis_parallel_safe 属性)•
并发:asyncio.gather(...)for
循环依次 await
维度
2:单工具执行 这个工具自身的 Python
代码会卡死主线程吗?
Tool.executeinspect.iscoroutinefunction)•
异步(async def):主线程协程直接跑def):扔进系统线程池 asyncio.to_thread
1.
核心澄清:异步队列里流动的到底是什么?
请务必注意 : 异步队列 queue
里面装的不是工具执行的最终返回值(ToolResult) !batch_out = await runner
一次性拿到的。队列里流动的,纯粹是工具在运行中途发射出来的“中间流式进度事件”(ToolExecutionUpdate) 。
2.
如果工具是【并行】,底层具体怎么运转?
假设模型单轮发起了 3
个工具调用:tool_1(async def
协程)、tool_2(普通 def
计算)、tool_3(普通 def 命令),且均声明为
is_parallel_safe=True: -
宏观调度 :registry.execute_batch 使用
asyncio.gather 将它们同时打出去并发运行; -
微观分流 :tool_1
在主事件循环中跑协程;tool_2 和 tool_3 被
asyncio.to_thread
分配给系统线程池中的两个独立子线程并行跑; - 进度汇入 :
- tool_1 在主线程调用 on_update → safe_put_update 识别为主线程
→ queue.put_nowait
直接丢入; - tool_2 在子线程调用 on_update
→ safe_put_update
识别为工作线程 → 通过
loop.call_soon_threadsafe 安全跨线程预约投递; -
前台感知 :前台
while True: item = await queue.get()
无论谁的进度先到,就立刻把谁先 yield
出来给外部界面 ,呈现出多个任务交织滚动的极致流式体验。
3.
如果工具是【串行】,又是如何处理的?
假设模型发起了一个写操作
edit_file(is_parallel_safe=False)和一个读操作
read_file: -
宏观调度 :触发“一票否决”,registry.execute_batch
退化为顺序遍历:for tc in tool_calls: await self.execute_tool(tc, ...);
- 微观分流与队列复用 : - 先执行
edit_file:中途产生的进度事件依次塞入 queue
→ 前台立刻实时打印,直到
edit_file 彻底结束; - 接着执行
read_file:中途产生的进度事件塞入同一个 queue
→ 前台接着打印,直到
read_file 结束; - 整批串行任务结束:触发
finally 塞入 _SENTINEL 哨兵,前台收工退出; -
整套传送带与哨兵机制 100% 无缝复用,零多余逻辑 。
实战指南:什么样的工具写成
async def?什么样的工具写成普通 def?
在 Agent
系统的工程实践中,判断工具应该写成异步(async def) 还是同步(普通
def) ,核心依据只有一个:
这个工具在执行时,主要是在“等外部事件(网络/其他服务/子代理)”,还是在“让本地
CPU/操作系统猛跑”?
1. 必须 /
适合写成【异步工具】(async def)
核心特征:需要长时间等待外部世界响应,等待期间可以主动让出
CPU 控制权(await),让主线程去处理其他任务。
子代理委派(Subagent / Task) :例如
task(prompt="审查代码", agent="reviewer")。子 Agent
还要经历自己的推理与工具循环,耗时可达数秒甚至数分钟,必须通过
await subagent.run() 异步挂起。网络检索与外部 API(Web Search / Crawl / MCP
协议) :底层依赖 httpx.AsyncClient 或
aiohttp,等待远程服务器网络握手与数据传输。浏览器自动化(Playwright /
Browser) :等待页面加载(domcontentloaded)、等待元素渲染、网络空闲等,天然全是非阻塞异步调用。定时器与轮询工具 :内部使用
await asyncio.sleep(delay) 优雅挂起,绝不卡死主线程。
2. 通常写成【同步工具】(普通
def)
核心特征:调用的几乎全是本地现成计算资源、操作系统 API
或传统三方阻塞库,代码自上而下顺次执行。
本地快速小文件读写与编辑(read /
write / edit) :在现代 SSD 上读写几十
KB 文本只需 0.1~0.5 毫秒,直接使用 open() 或
pathlib.Path.read_text()
简单直观,无需额外创建异步事件调度开销。CPU 密集型计算与正则扫描(grep /
calculator / ast-grep) :底层是纯 CPU
满负荷运算或 C/Rust 原生扩展,中途根本没有空闲等待时间,写成
async def 毫无意义(无处可 await)。简单封装传统阻塞库的系统工具(bash) :许多开发者习惯直接调用
subprocess.run(cmd, shell=True),这种阻塞操作适合作为普通
def。
3.
框架的“零心智负担”自适应无感桥接
为了让工具开发者彻底摆脱心智负担,my-pi-agent 在
Tool.execute 内部建立了自适应分流机制:
1 2 3 4 5 6 if self .is_async: result = await async_func_call() else : result = await asyncio.to_thread(func_call)
工程收益 :开发者想怎么写就怎么写。写同步无需担心卡死
Agent,写异步能够极致榨干事件循环吞吐量。
场景特点
建议定义为
典型例子
框架底层的实际执行环境
需要联网 /
调远程服务 async defweb_search、http_fetch、mcp_client主事件循环(协程非阻塞挂起)
需要调用子 Agent / 嵌套
Agent async deftask、delegate_subagent主事件循环(协程非阻塞挂起)
浏览器自动化 async defagent_browser、playwright_click主事件循环(协程非阻塞挂起)
本地读写文件 /
简单计算 普通 def
read、write、edit、calculate线程池
asyncio.to_thread(极速跑完)
运行 Shell /
本地进程 普通 def
bash(subprocess.run)线程池
asyncio.to_thread(后台运行)
纯正则搜索 / AST
语法分析 普通 def
grep、ast_grep_search线程池
asyncio.to_thread(算完返回)
7.
深入底层:并发调度与同异步执行全景(宏观批处理 vs 单工具执行)
在阅读工具执行源码时,很多人容易把“宏观调度的串并行” 与“底层函数的同异步” 混为一谈,甚至产生误解:“是不是并行工具就是用子线程跑,串行工具就是直接跑?”
实际上,在 my-pi-agent
的工具流水线中,这是两个完全解耦的独立正交维度 :
1 2 3 4 5 6 7 8 9 10 11 12 13 14 15 16 17 18 19 ┌─────────────────────────────────────────────────────────────────────────────┐ │ 两个完全正交的架构维度 │ ├─────────────────────────────────────────────────────────────────────────────┤ │ │ │ 【维度 1:宏观批处理 (Macro Batch Scheduling)】 │ │ • 关心的核心问题:这批工具是一起开工,还是一个接一个排队? │ │ • 决定者与位置:ToolRegistry.execute_batch (基于 is_parallel_safe 属性) │ │ • 实现手段: │ │ - 全并发:整批全为 is_parallel_safe=True ➔ asyncio.gather(...) 并发 │ │ - 保序串行:含任一写入工具 ➔ 悲观回退,for 循环依次 await │ │ │ │ 【维度 2:单工具内部执行 (Micro Single-Tool Execution)】 │ │ • 关心的核心问题:这个工具自身的 Python 代码会卡死事件循环主线程吗? │ │ • 决定者与位置:Tool.execute (基于 inspect.iscoroutinefunction 静态自省) │ │ • 实现手段: │ │ - 原生异步:async def ➔ 直接 await tool.func(...) (主线程协程调度) │ │ - 同步阻塞:普通 def ➔ asyncio.to_thread(_sync_run) 扔进线程池 │ │ │ └─────────────────────────────────────────────────────────────────────────────┘
1. 维度
1:宏观批处理调度(并发还是串行?)
由 ToolRegistry.execute_batch
全权掌舵。其采用“一票否决制”的悲观读写分流策略 :
全并发加速(asyncio.gather) :
触发条件:大模型在一轮中呼叫的所有工具,其
tool.is_parallel_safe 均为 True(例如同时读取
3 个只读文件、查询 2 个外部只读 API)。
调度方式:使用
asyncio.gather(*[self.execute_tool(...) for ...])
一起并发调度,整体耗时从累加缩减为“取决于最慢的那一个”。
保序串行(悲观回退) :
触发条件:这一批调用中哪怕包含任一一个
is_parallel_safe=False 的工具(如写入文件
write、编辑文件 edit、运行终端命令
bash)。
调度方式:整批工具立刻放弃并发,严格退化为按大模型在提示词里的原始声明顺序(Source
Order),使用普通的 for
循环逐个串行执行 。
架构不变式 :严防因果倒置(例如大模型本意是“先编辑代码,再执行测试”,如果盲目并发,可能导致测试在代码还没写完前就抢跑报错)。
2. 维度
2:单工具内部执行(异步协程还是线程池?)
无论宏观上是 asyncio.gather 并发还是 for
循环串行,每个具体工具在执行时,依然由其自身的实现形态决定在哪个线程运行 :
1 2 3 4 5 6 7 if inspect.iscoroutinefunction(self .func): result = await self .func(...) else : result = await asyncio.to_thread(_sync_run)
怎么判断工具该写成【异步工具(async def)】还是【同步工具(普通
def)】?
核心依据只有一个:这个工具在执行时,主要是在“等外部世界响应”,还是在“占用本地
CPU 或操作系统的同步进程”?
工具类型
函数签名
典型应用场景
内部执行机制
为什么这么写?
异步工具 async def• 子代理委派(task)fetch_web / aiohttp)
直接在主事件循环中
await,不占用额外工作线程
子代理和网络请求动辄等待几秒至几十秒,期间主动让出
CPU 控制权,主线程可并发处理其他事件广播或打断信号。
同步工具 普通 def
• 本地文件操作(read /
write / edit)math / json)bash subprocess)
框架自动通过
asyncio.to_thread 投入底层线程池
Python 的 subprocess.run
或标准 open()
是同步阻塞的系统调用,如果不扔进子线程,主线程事件循环会被直接焊死,导致打字机流式输出和
UI 动画瞬间冻结!
3.
两套机制交织碰撞:异步队列与跨线程安全
现在把两张拼图合在一起,整个底层流式通信的全景就清晰无比了:
1 2 3 4 5 6 7 8 9 10 11 12 13 14 15 16 17 18 19 20 21 22 23 24 25 26 27 ┌─────────────────────────────────────────────────────────────────────────────┐ │ 宏观调度 (execute_batch): 决定是 asyncio.gather 还是串行 for 循环 │ └──────────────────────────────────────┬──────────────────────────────────────┘ │ 遍历调起单个工具 (execute_tool) ▼ ┌─────────────────────────────────────────────────────────────────────────────┐ │ 单工具执行 (Tool.execute): │ │ ├─ Case A: 若工具是 async def (如 task) ────────► 在主线程跑 │ │ │ │ │ │ │ ▼ 调 on_update │ │ │ 直接 queue.put_nowait() │ │ │ │ │ └─ Case B: 若工具是同步 def (如 bash) ────────► 扔进工作子线程跑 │ │ │ │ │ ▼ 调 on_update │ │ 跨线程必须用 call_soon_threadsafe 桥接! │ └──────────────────────────────────────┬──────────────────────────────────────┘ │ 全部安全汇入 ▼ ┌──────────────────────────────────┐ │ 主线程专属 asyncio.Queue (传送带) │ └─────────────────┬────────────────┘ │ await queue.get() ▼ ┌─────────────────────────────────────────────────────────────────────────────┐ │ 外部异步生成器 (_execute_tools_turn): 实时 yield ToolExecutionUpdate 给 UI │ └─────────────────────────────────────────────────────────────────────────────┘
无论这批工具在宏观上是并发还是串行 :后台都运行在独立的
runner = asyncio.create_task(...) 任务中,前台始终是
while True: item = await queue.get() 的流畅消费者;无论具体工具是运行在主线程的协程、还是运行在子线程里的阻塞代码 :safe_put_update
都能通过 threading.get_ident() == loop_thread_id
自动识别,丝滑抹平线程边界,保证事件安全、保序地呈现在用户眼前!